You're reading an old version of this documentation. For up-to-date information, please have a look at v0.12.
Plot annotations: Lines
Classes used:
Models:
Plotting:
Annotations:
Graphical representation of data and results is one of the most important aspects of presenting scientific results. A good figure is a figure allowing the reader to immediately catch the important aspects, not relying on reading the (nevertheless always important) caption with more description.
To this end, there is the frequent need to annotate figures, i.e. add additional lines, areas, or even text. This is what can be done with the concrete subclasses of aspecd.annotation.PlotAnnotation.
Here, we focus on simple vertical and horizontal lines added to a plot that are often used as a guide to the eye of the reader.
Recipe
Shown below is the entire recipe. As this is quite lengthy, separate parts will be detailed below in the “Results” section.
  1format:
  2  type: ASpecD recipe
  3  version: '0.2'
  4
  5settings:
  6  autosave_plots: False
  7
  8tasks:
  9  - kind: model
 10    type: Zeros
 11    properties:
 12      parameters:
 13        shape: 1001
 14        range: [-10, 10]
 15    result: dummy
 16
 17  - kind: model
 18    type: Lorentzian
 19    from_dataset: dummy
 20    properties:
 21      parameters:
 22        width: 2
 23    result: model_data
 24    comment: >
 25      Create Lorentzian with width set explicitly
 26
 27  - kind: singleplot
 28    type: SinglePlotter1D
 29    properties:
 30      properties:
 31        axes:
 32          xlabel: "$position$ / a.u."
 33      parameters:
 34        tight_layout: True
 35      filename: plotting-annotation-lines-vertical.pdf
 36    apply_to:
 37      - model_data
 38    result:
 39      - plot-with-vertical-lines
 40    comment: >
 41      Plotter that gets annotated later
 42
 43  - kind: plotannotation
 44    type: VerticalLine
 45    properties:
 46      parameters:
 47        positions: [-2, 2]
 48      properties:
 49        color: green
 50        linewidth: 2
 51        linestyle: dotted
 52        alpha: 0.3
 53    plotter: plot-with-vertical-lines
 54    result: vertical-lines
 55    comment: >
 56      Two styled vertical lines marking the FWHM
 57
 58  - kind: plotannotation
 59    type: HorizontalLine
 60    properties:
 61      parameters:
 62        positions: [0.5]
 63      properties:
 64        color: red
 65        linewidth: 1
 66        linestyle: dashed
 67    result: horizontal-line
 68    comment: >
 69      Styled horizontal line marking the FWHM, used later in plot
 70
 71  - kind: singleplot
 72    type: SinglePlotter1D
 73    properties:
 74      properties:
 75        axes:
 76          xlabel: "$position$ / a.u."
 77      parameters:
 78        tight_layout: True
 79      filename: plotting-annotation-lines-horizontal.pdf
 80    apply_to:
 81      - model_data
 82    annotations:
 83      - horizontal-line
 84    comment: >
 85      Plotter using an existing annotation
 86
 87  - kind: singleplot
 88    type: SinglePlotter1D
 89    properties:
 90      properties:
 91        axes:
 92          xlabel: "$position$ / a.u."
 93      parameters:
 94        tight_layout: True
 95      filename: plotting-annotation-lines-both.pdf
 96    apply_to:
 97      - model_data
 98    annotations:
 99      - horizontal-line
100      - vertical-lines
101    comment: >
102      Plotter using both existing annotations
Results
Examples for the figures created in the recipe are given below. While in the recipe, the output format has been set to PDF, for rendering them here they have been converted to PNG.
As this is a rather lengthy recipe demonstrating different scenarios, the individual cases are shown separately, each with the corresponding section of the recipe.
Vertical lines
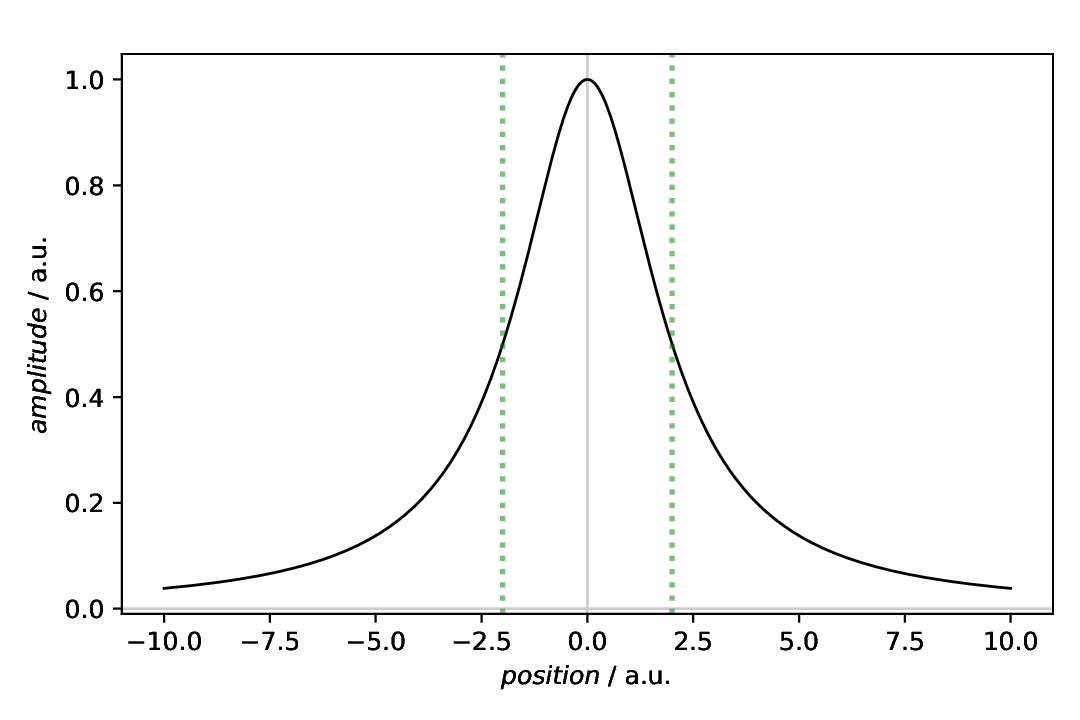
The scenario: We have a Lorentzian and want to mark the full width at half maximum (FWHM). Thankfully, the respective positions for the vertical lines have a very simple mathematical relation to the line width set: the FWHM is exactly twice the line width.
Here, we first plot the data, and afterwards annotate the plot with an annotation. This is why the plot task as a result set with its result key that is referred to in the annotation task with the plotter key.
27  - kind: singleplot
28    type: SinglePlotter1D
29    properties:
30      properties:
31        axes:
32          xlabel: "$position$ / a.u."
33      parameters:
34        tight_layout: True
35      filename: plotting-annotation-lines-vertical.pdf
36    apply_to:
37      - model_data
38    result:
39      - plot-with-vertical-lines
40    comment: >
41      Plotter that gets annotated later
42
43  - kind: plotannotation
44    type: VerticalLine
45    properties:
46      parameters:
47        positions: [-2, 2]
48      properties:
49        color: green
50        linewidth: 2
51        linestyle: dotted
52        alpha: 0.3
53    plotter: plot-with-vertical-lines
54    result: vertical-lines
55    comment: >
56      Two styled vertical lines marking the FWHM
Note that you provide a list of positions for the lines. While it is always a list, this allows you to provide arbitrary numbers of positions for vertical lines.
The appearance of the lines can be controlled in quite some detail. For the styling available, see the documentation of the aspecd.plotting.LineProperties class - and use sparingly in scientific context. After all, it is science, not pop art.
The resulting figure is shown below:

Fig. 21 Plot with two vertical lines as annotation. These two lines together mark the full width at half maximum (FWHM) of the displayed Lorentzian curve. While not always sensible in scientific context, the lines have been styled here, using a different line style, width, color, and transparency. Note that in this case, the plot(ter) has been defined first, with a result key for later reference, and the annotation afterwards, referring to the plotter using the plotter key.
Horizontal line
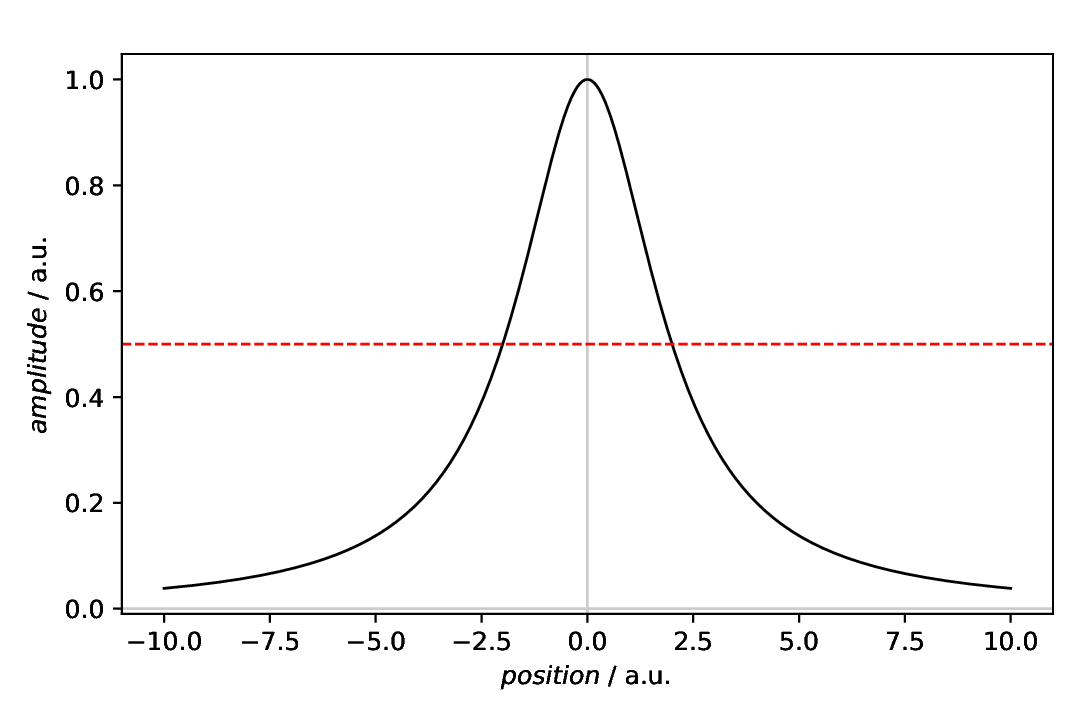
The scenario is similar to the one above: We have a Lorentzian and want to mark the half maximum corresponding to the full width at half maximum (FWHM). Given that we have a Lorentzian with maximum set to 1 (default value), this is trivial in our case.
Here, we first create the annotation and afterwards plot the data and annotate the plot with this annotation. This is why the annotation task as a result set with its result key that is referred to in the plotter task with the annotations key. Mind the plural here, as a plot can be annotated with more than one annotation.
58  - kind: plotannotation
59    type: HorizontalLine
60    properties:
61      parameters:
62        positions: [0.5]
63      properties:
64        color: red
65        linewidth: 1
66        linestyle: dashed
67    result: horizontal-line
68    comment: >
69      Styled horizontal line marking the FWHM, used later in plot
70
71  - kind: singleplot
72    type: SinglePlotter1D
73    properties:
74      properties:
75        axes:
76          xlabel: "$position$ / a.u."
77      parameters:
78        tight_layout: True
79      filename: plotting-annotation-lines-horizontal.pdf
80    apply_to:
81      - model_data
82    annotations:
83      - horizontal-line
84    comment: >
85      Plotter using an existing annotation
Note that you need to provide a list of positions for the lines, even if you only want to have one line, as in this case.
Regarding styling of the lines, the same is true as said above: use carefully in a scientific context, and always have in mind that some people would like to print out your figure(s) greyscale, as colour is still expensive. See the documentation of the aspecd.plotting.LineProperties class for styling options available.
The resulting figure is shown below:

Fig. 22 Plot with one horizontal line as annotation. This line marks the half maximum relevant for the full width at half maximum (FWHM) of the displayed Lorentzian curve. This line has been styled as well slightly. Note that in this case, the annotation has been defined first, with a result key for later reference, and the plot(ter) afterwards, referring to the annotation using the annotations key. Mind the plural here, as a plotter can have multiple annotations.
Vertical and horizontal lines
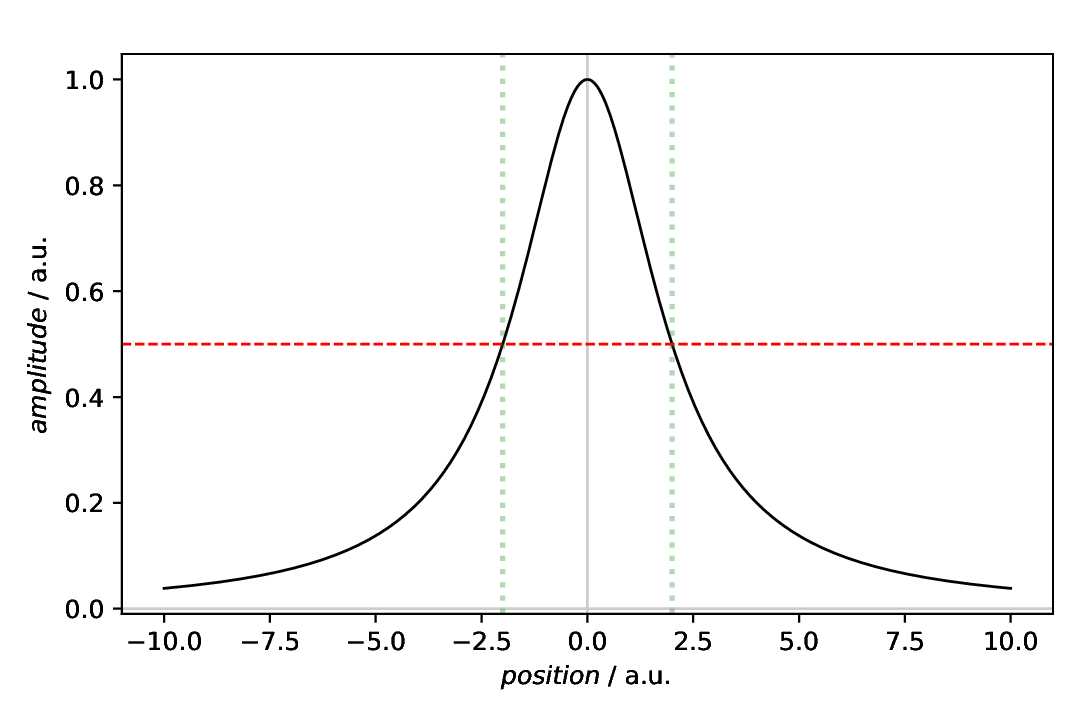
Of course, particularly for the scenario shown here where we want to mark the FWHM of a Lorentzian, combining both, vertical and horizontal lines may be sensible. This is shown in the final part of the recipe.
Although previously explicitly not mentioned, the first annotation had a results key as well that was unnecessary for the first part of the recipe. However, as you can see, you can define both, a plotter to annotate as well as a result label to use an annotation later.
As the two annotations used here have been defined previously, we show only the plotter here:
 87  - kind: singleplot
 88    type: SinglePlotter1D
 89    properties:
 90      properties:
 91        axes:
 92          xlabel: "$position$ / a.u."
 93      parameters:
 94        tight_layout: True
 95      filename: plotting-annotation-lines-both.pdf
 96    apply_to:
 97      - model_data
 98    annotations:
 99      - horizontal-line
100      - vertical-lines
101    comment: >
102      Plotter using both existing annotations
Finally, it is obvious, why the annotations key of the plot task is plural: you can (and often enough will) have more than one annotation in one plot.
The resulting figure is shown below:

Fig. 23 Plot with both previous annotations, one horizontal line and two vertical lines. These lines mark the full width at half maximum (FWHM) of the displayed Lorentzian curve. Note that here, the plotter makes use of both previously defined annotations. Upon closer inspection, you will see that the first annotation has a result key as well, although we didn’t talk about it there and it was not necessary in the first scenario. As ths plotter has multiple annotations, the plural of the key annotations makes sense obviously.
Comments
As usual, a model dataset is created at the beginning, to have something to show. Here, a Lorentizan with a slightly increased line width. Using the Lorentzian is based on the very simple mathematical relation between line width and FWHM.
For simplicity, a generic plotter is used, to focus on the annotations.
The sequence of defining plot and annotation(s) does not matter. You only need to provide the
resultkey with a unique name for whichever task you define first, to refer to it in the later task(s).Styling the lines, as shown here for pure demonstration purposes, shall be used carefully in scientific presentations, but can nevertheless be very helpful.
While technically speaking, you could highlight entire regions by setting a rather large line width, colour, and possibly transparency, this is the realm of the dedicated
aspecd.annotation.VerticalSpanandaspecd.annotation.HorizontalSpanannotations. See the Plot annotations: Vertical span (area) example for further details.